Labeling DeepDive data with Mindtagger
This document describes a common data labeling task one has to perform while developing DeepDive applications and introduces a graphical user interface tool dedicated for accelerating such task. In this document we use the terms annotating, marking, and tagging data interchangeably with labeling data.
To assess the performance of a DeepDive application, one typically computes precision and recall of the results produced by the DeepDive application. Let's define some terms before we move on. A relevant set is a set of information one wants to extact, e.g., entities or relationships. DeepDive's positive prediction is a set of information extracted by a DeepDive application whose assigned expectation value is greater than a certain threshold. Precision is a ratio of how much of the relevant set is represented in the DeepDive's positive prediction. Precision is 1 if DeepDive makes no mistakes in its positive prediction by assigning high expectations only to those that are also in the relevant set (i.e., no false positives). As DeepDive assigns high expectation values to ones that are not in the relevant set, precision decreases (i.e., more false postivies were introduced). On the other hand, recall is a ratio of how much of the DeepDive's positive prediction set is represented in the relevant set. Recall is 1 if DeepDive does not miss any information in the relevant set (i.e., no false negatives). Recall decreases as DeepDive either assigns low expectation to ones in the relevant set or failes to capture them during the candidate extraction steps.
Because the relevant set of a corpus is usually not known in advance, there must be a human input to inspect a sample of DeepDive's predictions as well as the corpus and to answer whether each of them is relevant or not to estimate the true value. Estimating the precision can be as simple as randomly sampling predictions with expectation higher than a certain threshold, then counting how many were also in the relevant set. However, estimating the recall accurately can be very costly since one needs to find enough number of relevant information sampled from the entire corpus.
In this document, we show how the precision estimation for a DeepDive application can be done in a systematic and convenient way using a graphical user interface.
Mindtagger: A tool for labeling data
Mindtagger is a general data annotation tool that provides a customizable, interactive graphical user interface. An annotation task takes a list of items and a template that defines how each item should be rendered and what annotations can be added as inputs.
Mindtagger provides an interactive interface for users to look at the rendered items and quickly go through each of them to manually leave annotations. These annotations collected over time can be then outputted in various forms (SQL, CSV/TSV, and JSON) to be used outside of the tool such as augmenting the ground truth of a DeepDive application. Note that Mindtagger currently does not help with the sampling part but only supports the labeling task for the precision/recall estimation. Therefore, producing the right samples for the correct estimation is a Mindtagger user's responsibility.
Use case 1: Measuring precision of the spouse example
In the following few steps, we explain how Mindtagger can help the user to perform a precision estimation task using the spouse example in our tutorial.
All commands and path names used in the rest of this section is consistent with the code under examples/spouse/.
cd examples/spouse/
1.1. Prepare the data items to inspect
First, you need to grab a reasonable number of samples for the precision task.
Using the SQL query shown below, you can get a hundred positive predictions with threshold 0.9 from has_spouse relationship with the array of words of the sentence the relationship was mentioned and two text spans mentioning the two persons involved.
-- labeling/has_spouse-precision/sample-has_spouse.sql file

SELECT hsi.p1_id
     , hsi.p2_id
     , s.doc_id
     , s.sentence_index
     , hsi.label
     , hsi.expectation
     , s.tokens
     , pm1.mention_text AS p1_text
     , pm1.begin_index  AS p1_start
     , pm1.end_index    AS p1_end
     , pm2.mention_text AS p2_text
     , pm2.begin_index  AS p2_start
     , pm2.end_index    AS p2_end

  FROM has_spouse_inference hsi
     , person_mention             pm1
     , person_mention             pm2
     , sentences                  s

 WHERE hsi.p1_id          = pm1.mention_id
   AND pm1.doc_id         = s.doc_id
   AND pm1.sentence_index = s.sentence_index
   AND hsi.p2_id          = pm2.mention_id
   AND pm2.doc_id         = s.doc_id
   AND pm2.sentence_index = s.sentence_index
   AND       expectation >= 0.9

 ORDER BY random()
 LIMIT 100
Let's keep the result of the above SQL query in a file named has_spouse.csv.
deepdive sql <"labeling/has_spouse-precision/sample-has_spouse.sql" >"has_spouse.csv"
The lines in the generated has_spouse.csv should look similar to the following:
p1_id,p2_id,doc_id,sentence_index,label,expectation,tokens,p1_text,p1_start,p1_end,p2_text,p2_start,p2_end
b5d4091a-4fb0-4afb-8d49-65e985f1be21_65_13_13,b5d4091a-4fb0-4afb-8d49-65e985f1be21_65_11_11,b5d4091a-4fb0-4afb-8d49-65e985f1be21,65,,0.994,"{Danny,was,on,the,ground,in,a,pickup,truck,"","",while,Mickey,and,Stan,flew,above,"","",issuing,instructions,on,where,to,change,the,co,se,.}",Stan,13,13,Mickey,11,11
248c8a3a-ea00-454d-b018-968e410c190f_41_16_16,248c8a3a-ea00-454d-b018-968e410c190f_41_18_18,248c8a3a-ea00-454d-b018-968e410c190f,41,,0.98,"{``,While,I,'m,as,entertained,as,anyone,by,this,personal,back-and-forth,about,the,history,of,Donald,and,Carly,'s,career,"","",'',he,said,"","",``,for,the,55-year-old,construction,worker,out,in,that,audience,tonight,who,does,n't,have,a,job,"","",who,ca,n't,fund,his,child,'s,education,--,I,got,ta,tell,you,the,truth,--,they,could,care,less,about,your,career,'',___,FIGHTING,FOR,ATTENTION,ON,A,CROWDED,STAGE,With,a,record,number,of,debate,participants,"","",they,could,n't,all,stand,out,.}",Donald,16,16,Carly,18,18
bdff3acf-88a1-473a-b3d7-542ec6cf20a1_66_9_9,bdff3acf-88a1-473a-b3d7-542ec6cf20a1_66_7_7,bdff3acf-88a1-473a-b3d7-542ec6cf20a1,66,,0.996,"{Lucy,and,Simon,do,deliver,Chloé,to,Thomas,and,Pierre,"","",but,they,say,there,is,one,more,returned,person,they,want,.}",Pierre,9,9,Thomas,7,7
8fe3c398-184d-4c31-b8ce-31bde7445d87_2_17_20,8fe3c398-184d-4c31-b8ce-31bde7445d87_2_13_15,8fe3c398-184d-4c31-b8ce-31bde7445d87,2,,0.995,"{She,was,born,October,2,"","",1963,in,West,Helena,"","",Arkansas,to,Arvey,Lee,Turner,and,Dorothy,Ann,Taylor,Turner,.}",Dorothy Ann Taylor Turner,17,20,Arvey Lee Turner,13,15
fd868d84-0c8b-4f60-8050-77013669a6d5_18_4_5,fd868d84-0c8b-4f60-8050-77013669a6d5_18_1_2,fd868d84-0c8b-4f60-8050-77013669a6d5,18,,1,"{05,Randeep,Hooda,and,Lisa,Haydon,:,Soon,after,the,release,of,her,successful,film,Queen,"","",model-turned-actor,Lisa,Haydon,and,actor,Randeep,Hooda,were,snapped,in,Mumbai,late,in,the,night,.}",Lisa Haydon,4,5,Randeep Hooda,1,2
[...]
1.2. Prepare the Mindtagger configuration and template
In order to use these sampled data items with Mindtagger, you need to create two more files that define a task for Mindtagger: a configuration and a template.
Mindtagger configuration that looks like below should go into the mindtagger.conf file.
You can specify the path to the file holding the data items as well as the column names that are the keys, e.g. p1_id and p2_id in this example.
title: Labeling task for estimating has_spouse precision
items: {
    file: has_spouse.csv
    key_columns: [p1_id, p2_id]
}
template: template.html
As shown in the configuration, the template for the task is set to template.html.
A Mindtagger template is a collection of HTML fragments decorated with Mindtagger-specific directives that control how the data items are rendered and which tags and GUI elements should be available during the task.
For the precision task at hand, creating a template.html file with contents similar to the following will do the job.
<mindtagger mode="precision">

  <template for="each-item">
    <strong title="item_id: {{item.id}}">{{item.p1_text}} -- {{item.p2_text}}</strong>
    with expectation <strong>{{item.expectation | number:3}}</strong> appeared in:
    <blockquote>
        <big mindtagger-word-array="item.tokens" array-format="postgres">
            <mindtagger-highlight-words from="item.p1_start" to="item.p1_end" with-style="background-color: yellow;"/>
            <mindtagger-highlight-words from="item.p2_start" to="item.p2_end" with-style="background-color: cyan;"/>
        </big>
    </blockquote>

    <div>
      <div mindtagger-item-details></div>
    </div>
  </template>

  <template for="tags">
    <span mindtagger-adhoc-tags></span>
    <span mindtagger-note-tags></span>
  </template>

</mindtagger>
The template is mostly self explanatory, and there are some JavaScript-like expressions appearing here and there.
In fact, Mindtagger GUI is implemented with AngularJS, and standard AngularJS expressions and directives can be used to extend the template.
In addition to the standard interface, Mindtagger provides several domain-specific directives and variables scoped within the template which are useful for creating the desired interface for data annotation.
For example, mindtagger-word-array directive makes it very simple to render an array of words which is a commonly used data representation across many text and NLP-based DeepDive applications.
Also the column values of each item are available through the item variable.
1.3. Launch Mindtagger
The user can now launch Mindtagger by passing the path to your mindtagger.conf file as a command-line argument such as follows:
mindbender tagger labeling/*/mindtagger.conf
If the default port (8000) is already used by other tasks, the user can specify an alternative port, say 12345 as follows:
PORT=12345 mindbender tagger labeling/*/mindtagger.conf
1.4. Mark each prediction as correct or not
Now, the user can point the browser to the URL displayed in the output of Mindtagger (or http://localhost:8000 if that doesn't work).
The following screenshot shows the annotation task in progress.
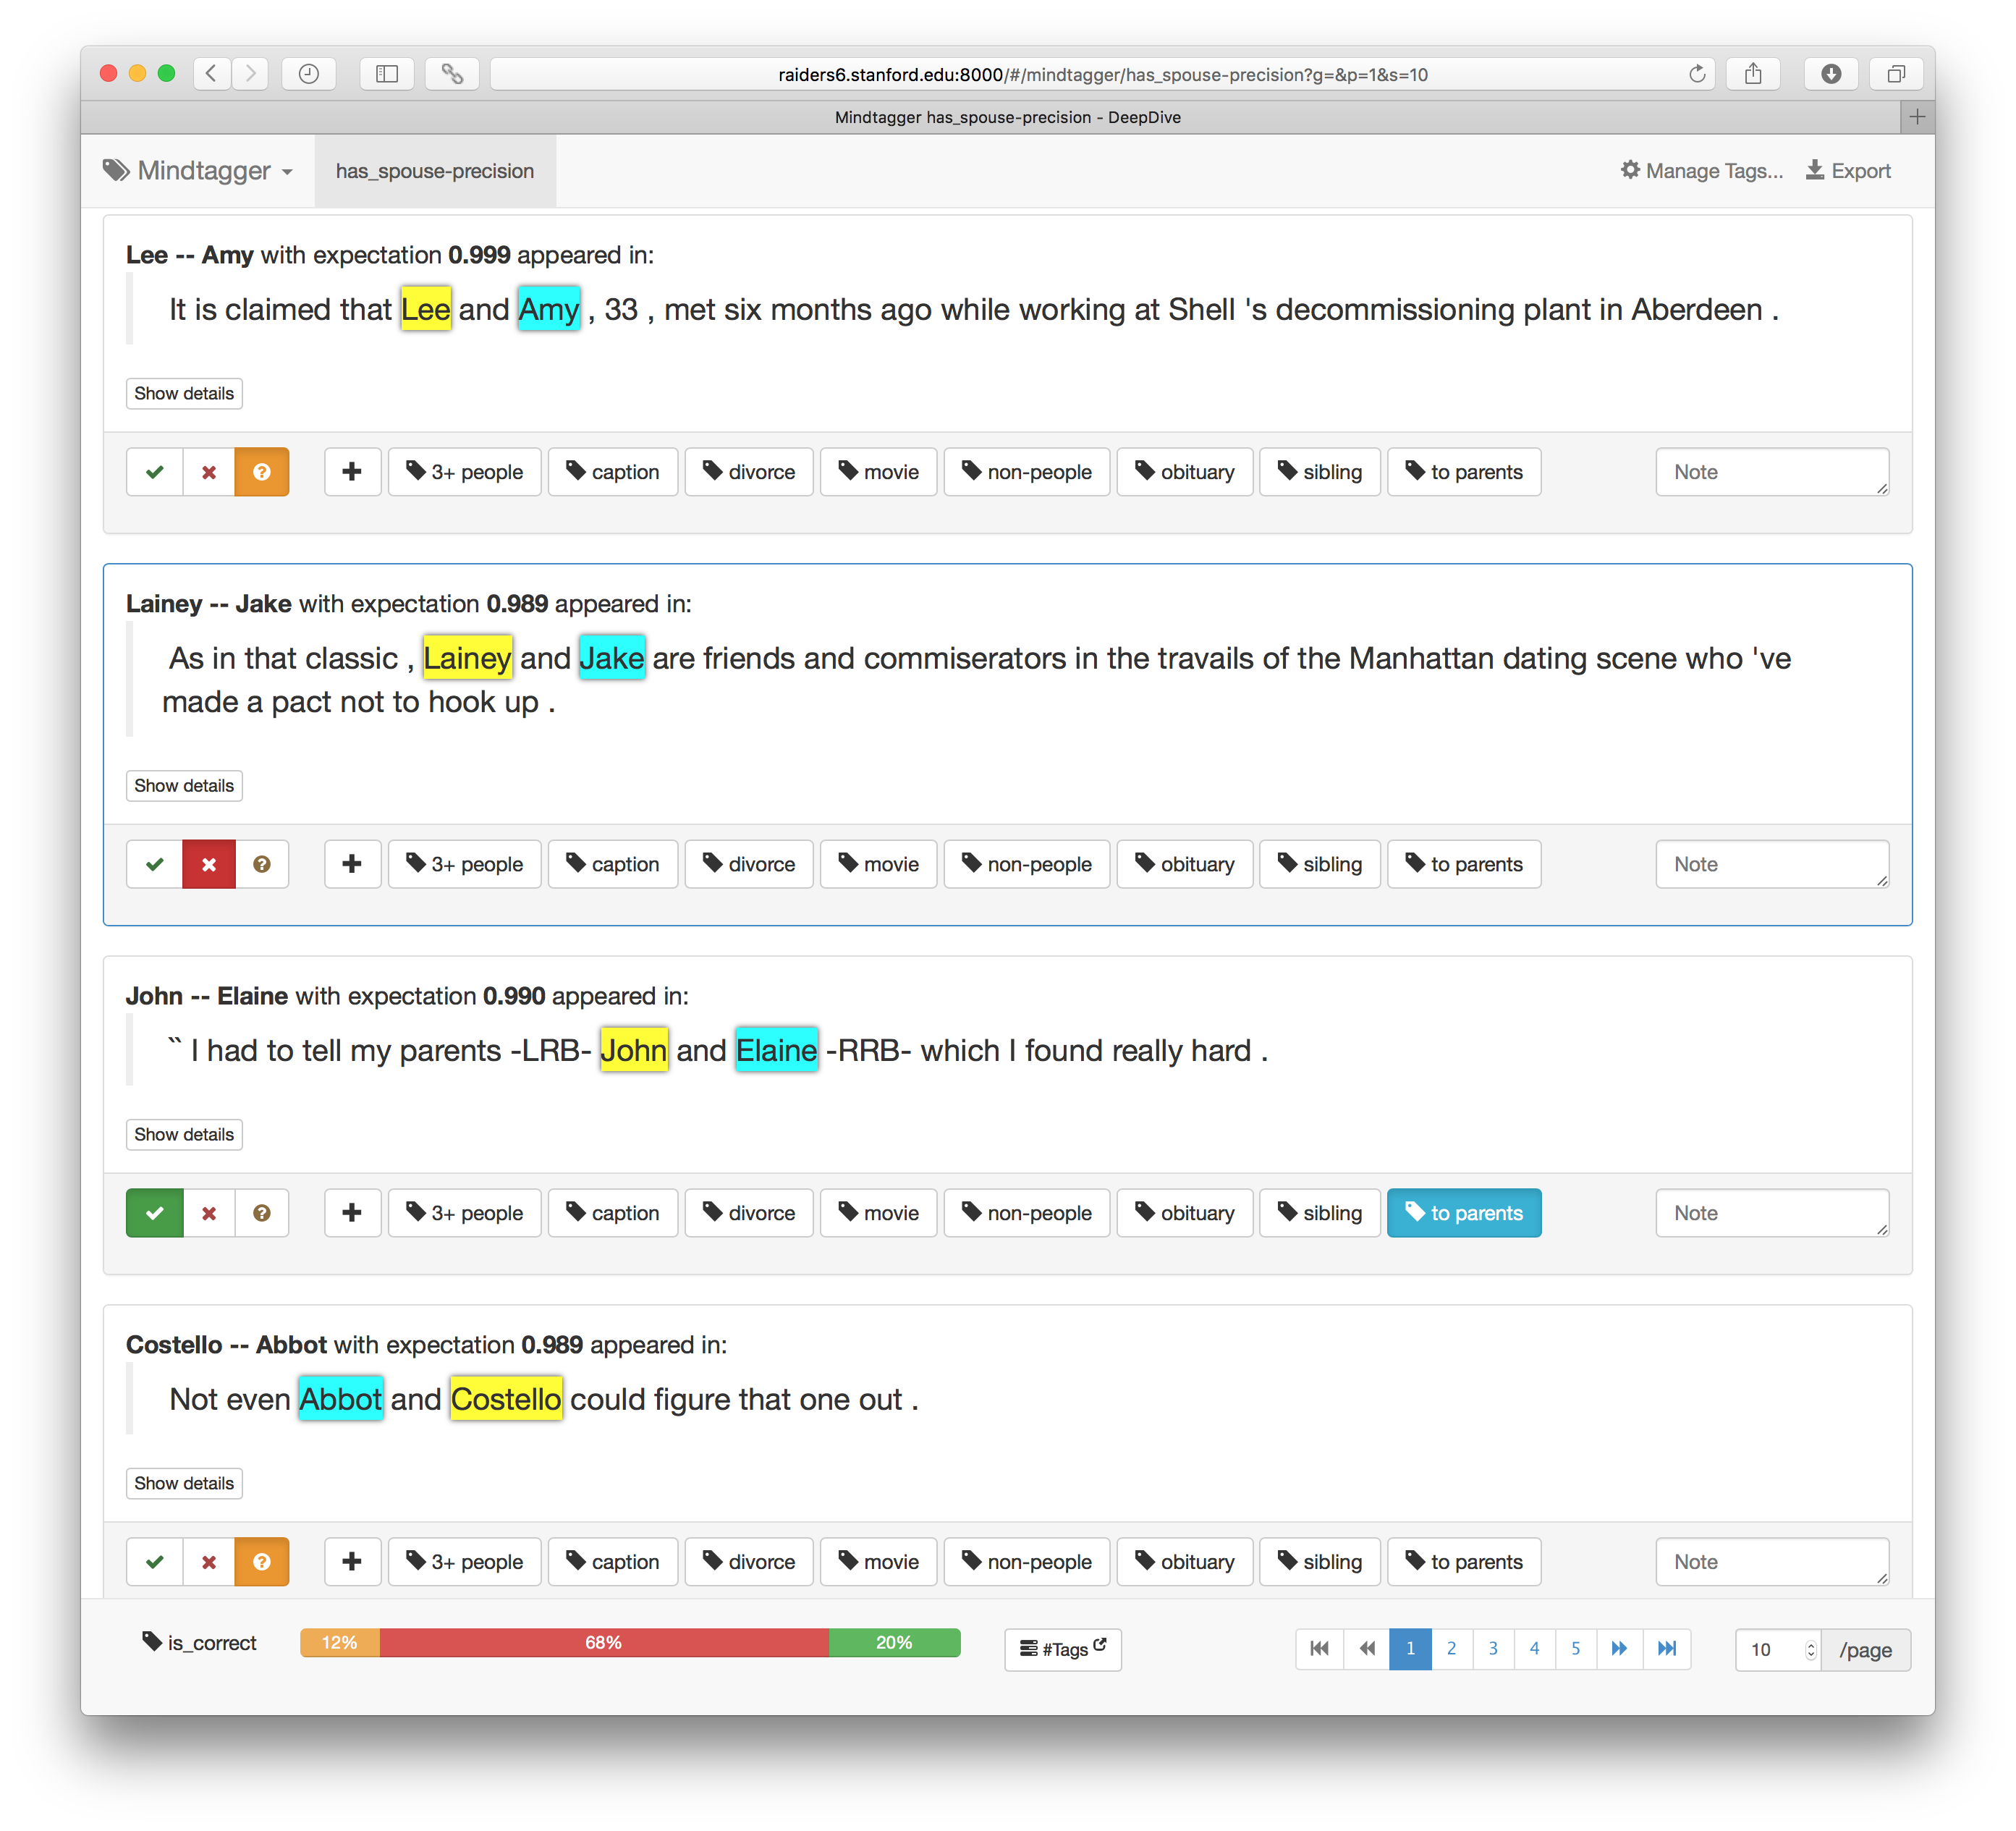
For the precision mode, Mindtagger provides dedicated buttons colored green/red for marking whether each item is relevant or not which will be linked to the value for is_correct tag.
One should inspect each item, and mark each item by pushing the right button.
(Hint: Mindtagger supports keyboard shortcuts to mark responses and move between items. Press ? key for details.)
Ad-hoc tags can also be added to each item, e.g., for marking the reason or type of error. These tags will be very useful later for clustering the false positive errors based on their type.
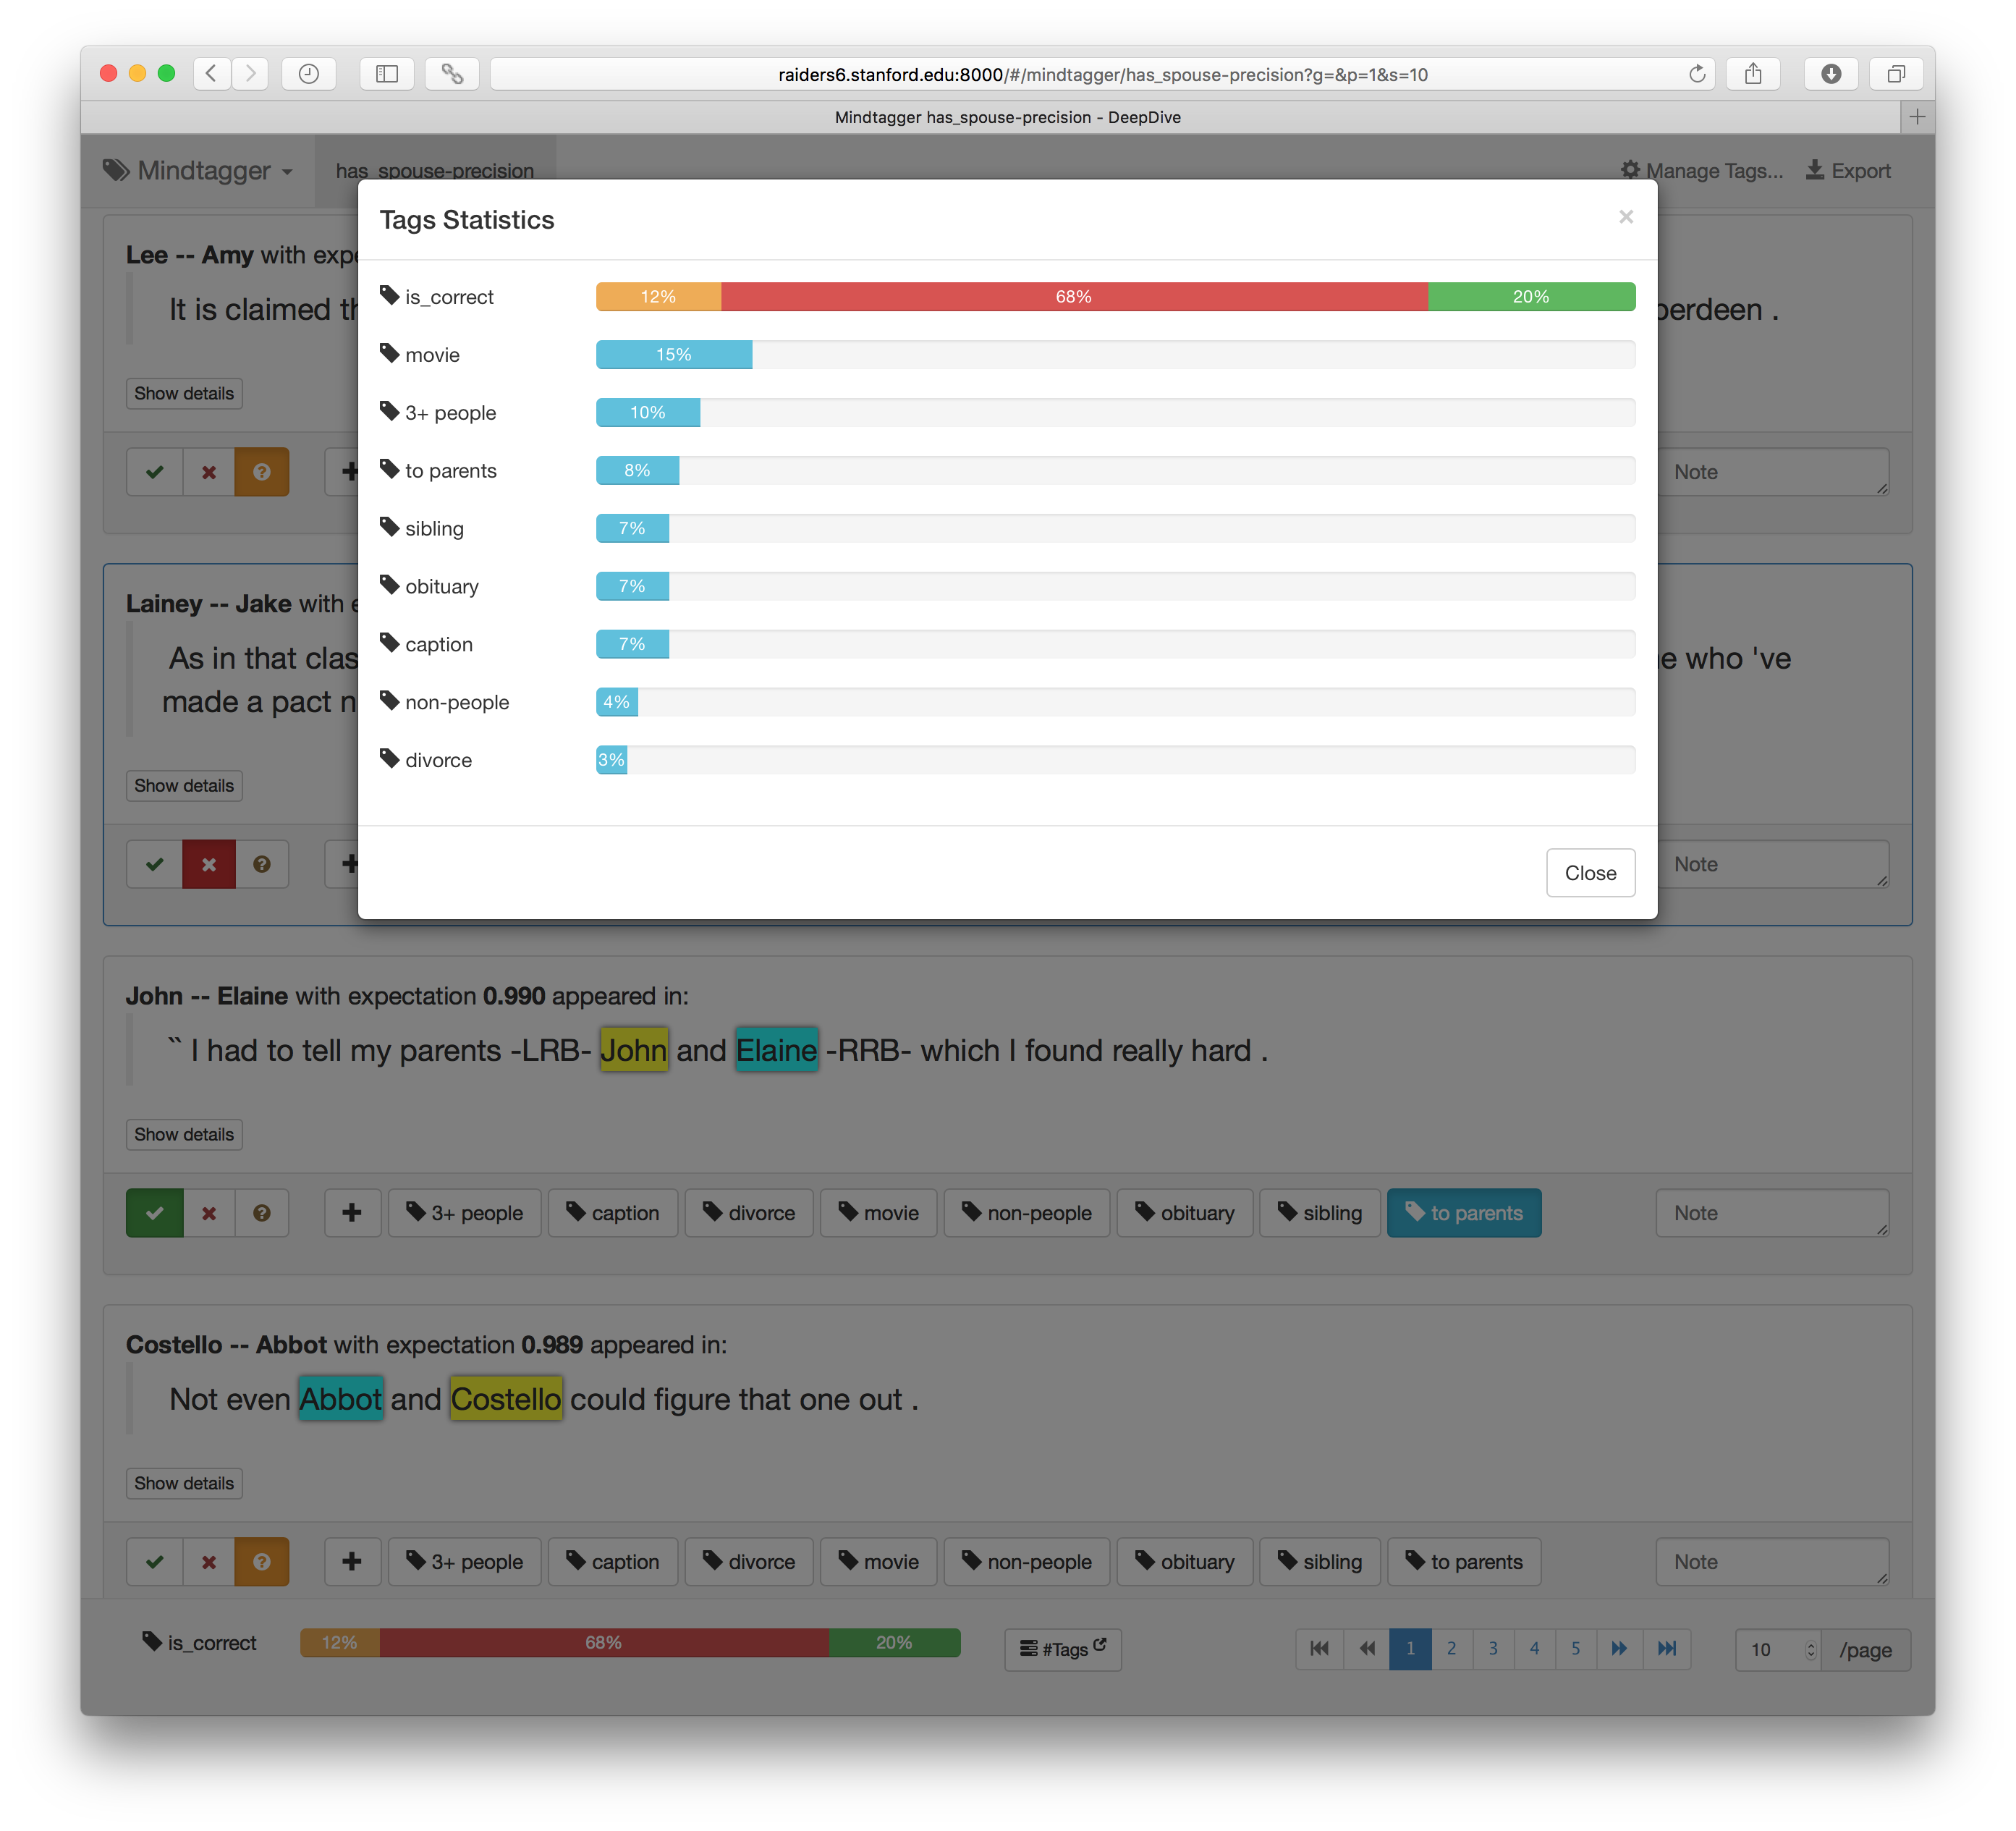
1.5. Count annotations
While inspecting every item, one can quickly check how many items were labeled with each tag using the "Tags" dropdown on the top-right corner.
1.6. Export annotations
Suppose one wants to augment the ground truth with the is_correct tags marked on each item throughout this task.
Using Mindtagger's export tags feature ("Export" on the top-right), one can download the tag data as SQL with UPDATE or INSERT statements, as well as CSV/TSV or JSON.
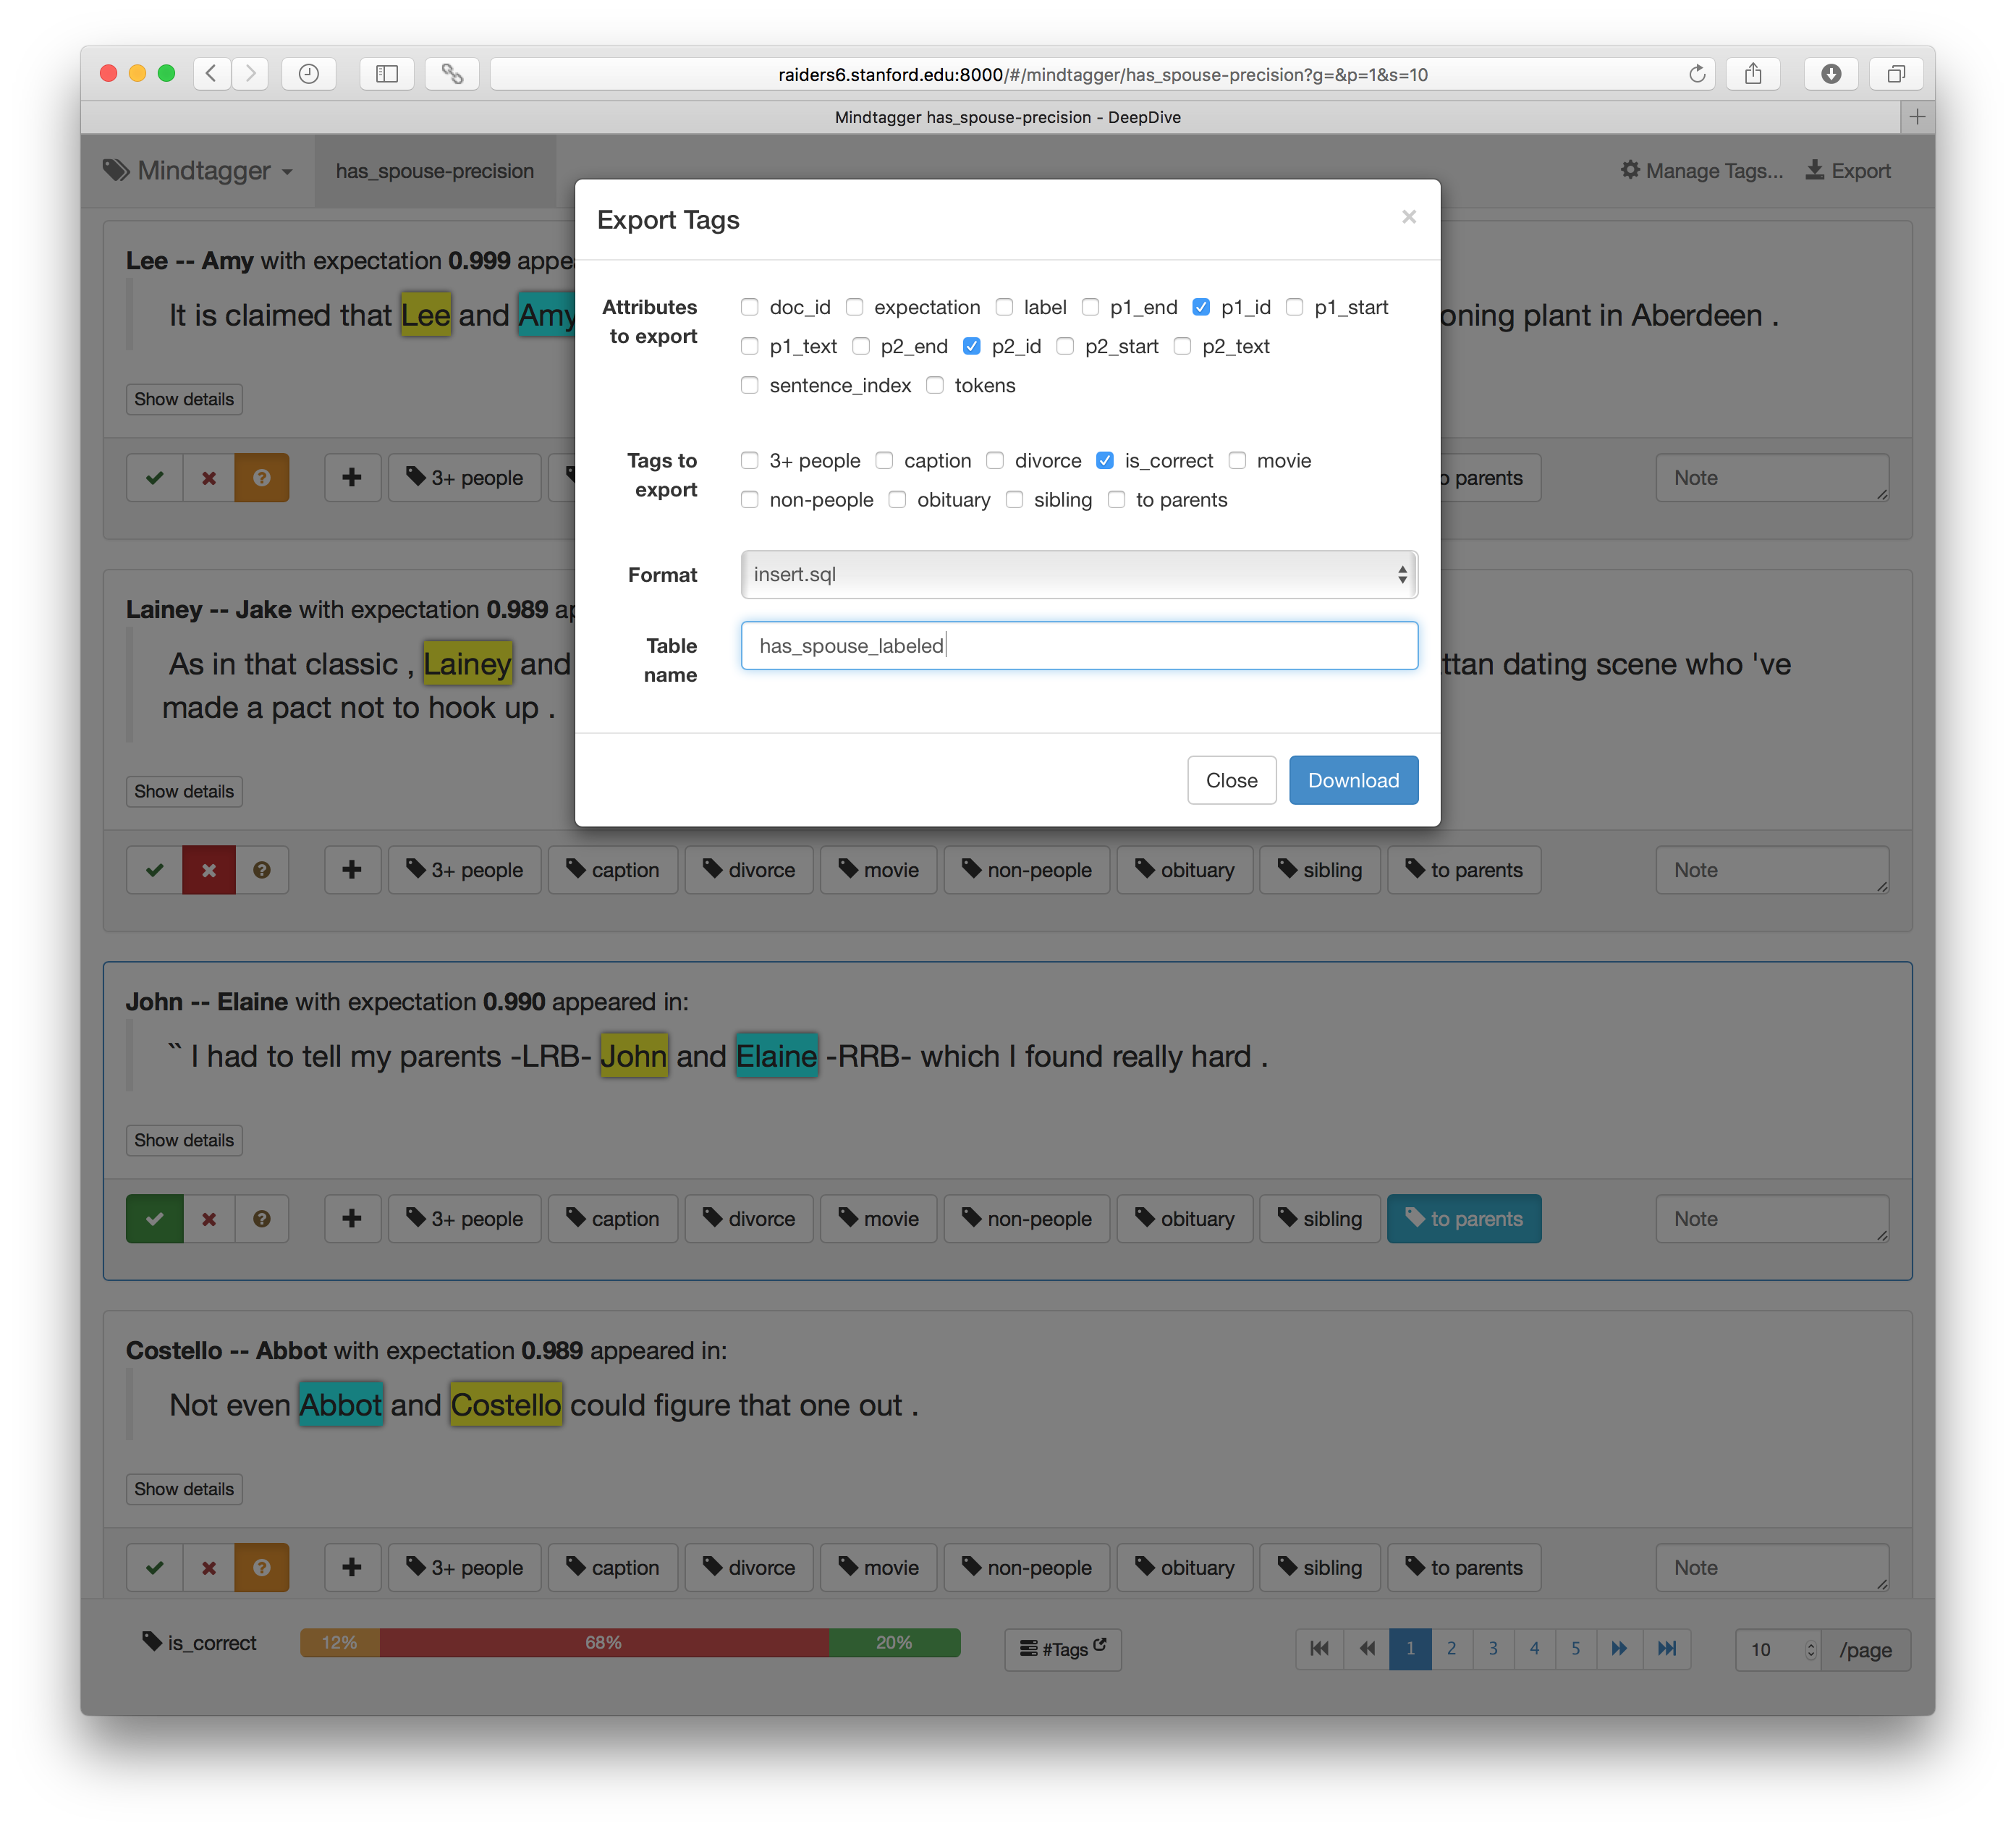
The downloaded SQL file will look like the following, ready to fill in the is_correct column of the has_spouse_labeled table in the database:
UPDATE "has_spouse_labeled" SET ("is_correct") = (FALSE)    WHERE "p1_id" = 'b5d4091a-4fb0-4afb-8d49-65e985f1be21_65_13_13' AND "p2_id" = 'b5d4091a-4fb0-4afb-8d49-65e985f1be21_65_11_11';
UPDATE "has_spouse_labeled" SET ("is_correct") = (FALSE)    WHERE "p1_id" = '248c8a3a-ea00-454d-b018-968e410c190f_41_16_16' AND "p2_id" = '248c8a3a-ea00-454d-b018-968e410c190f_41_18_18';
UPDATE "has_spouse_labeled" SET ("is_correct") = (FALSE)    WHERE "p1_id" = 'bdff3acf-88a1-473a-b3d7-542ec6cf20a1_66_9_9'   AND "p2_id" = 'bdff3acf-88a1-473a-b3d7-542ec6cf20a1_66_7_7';
UPDATE "has_spouse_labeled" SET ("is_correct") = (TRUE) WHERE "p1_id" = '8fe3c398-184d-4c31-b8ce-31bde7445d87_2_17_20'  AND "p2_id" = '8fe3c398-184d-4c31-b8ce-31bde7445d87_2_13_15';
UPDATE "has_spouse_labeled" SET ("is_correct") = (FALSE)    WHERE "p1_id" = 'fd868d84-0c8b-4f60-8050-77013669a6d5_18_4_5'   AND "p2_id" = 'fd868d84-0c8b-4f60-8050-77013669a6d5_18_1_2';
UPDATE "has_spouse_labeled" SET ("is_correct") = (FALSE)    WHERE "p1_id" = '38e9afdb-8323-4815-bcdc-40f54a69f0c8_54_13_14' AND "p2_id" = '38e9afdb-8323-4815-bcdc-40f54a69f0c8_54_10_11';
UPDATE "has_spouse_labeled" SET ("is_correct") = ('UNKNOWN')    WHERE "p1_id" = 'd30a9e45-3b43-4082-a6c2-ae4f1db5fbf7_10_4_4'   AND "p2_id" = 'd30a9e45-3b43-4082-a6c2-ae4f1db5fbf7_10_6_6';
[...]
For other ad-hoc tags, exporting into different formats may be more useful.
Use Case 2: Inspecting Features
After inspecting a number of predictions for estimating precision, user may start to wonder which features for the probabilistic inference were produced for each item. In this second example, we will show how one can extend the first example to include the features related to each prediction to get a better sense of what's going on. This is not a task for simply estimating a quality measure of the result, but rather a more elaborate error analysis task to understand which features are doing well/poorly and to gain more insights for debugging/improving the DeepDive application. Using ad-hoc tags will be much more important in this task since they will help to prioritize fixing more common source of errors.
2.1. Prepare mentions with relevant features
The following SQL query can be used to include the features related to the prediction along with their weights.
deepdive sql eval "
SELECT hsi.*
     , f.features
     , f.weights
FROM (

SELECT hsi.p1_id
     , hsi.p2_id
     , s.doc_id
     , s.sentence_index
     , hsi.label
     , hsi.expectation
     , s.tokens
     , pm1.mention_text AS p1_text
     , pm1.begin_index  AS p1_start
     , pm1.end_index    AS p1_end
     , pm2.mention_text AS p2_text
     , pm2.begin_index  AS p2_start
     , pm2.end_index    AS p2_end

  FROM has_spouse_inference hsi
     , person_mention             pm1
     , person_mention             pm2
     , sentences                  s

 WHERE hsi.p1_id          = pm1.mention_id
   AND pm1.doc_id         = s.doc_id
   AND pm1.sentence_index = s.sentence_index
   AND hsi.p2_id          = pm2.mention_id
   AND pm2.doc_id         = s.doc_id
   AND pm2.sentence_index = s.sentence_index
   AND       expectation >= 0.9

 ORDER BY random()
 LIMIT 100

) hsi, (
SELECT p1_id
     , p2_id
     , ARRAY_AGG(feature ORDER BY abs(weight) DESC) AS features
     , ARRAY_AGG(weight  ORDER BY abs(weight) DESC) AS weights
  FROM dd_weights_inf_istrue_has_spouse dd1
     , dd_inference_result_weights dd2
     , spouse_feature
 WHERE feature = dd_weight_column_0
   AND dd1.id = dd2.id
 GROUP BY p1_id,p2_id
) f
WHERE hsi.p1_id          = f.p1_id
  AND hsi.p2_id          = f.p2_id

" format=csv header=1 >has_spouse-with_features.csv
Running it will generate a has_spouse-with_features.csv that looks like below:
p1_id,p2_id,doc_id,sentence_index,label,expectation,tokens,p1_text,p1_start,p1_end,p2_text,p2_start,p2_end,features,weights
22adb358-5ea8-40bf-ad95-b5a7e1810bea_27_11_12,22adb358-5ea8-40bf-ad95-b5a7e1810bea_27_9_9,22adb358-5ea8-40bf-ad95-b5a7e1810bea,27,,0.996,"{Judge,Stephenson,is,preceded,in,death,by,his,parents,Paul,and,Carroll,Stephenson,.}",Carroll Stephenson,11,12,Paul,9,9,"{INV_NER_SEQ_[O],INV_NGRAM_1_[and],INV_POS_SEQ_[CC],INV_WORD_SEQ_[and],INV_LEMMA_SEQ_[and],IS_INVERTED,INV_STARTS_WITH_CAPITAL_[True_True],INV_BETW_D_[conj_and],INV_BETW_L_[conj_and],INV_BETW_[conj_and],INV_W_NER_L_1_R_1_[O]_[O],INV_LENGTHS_[3_0],""INV_W_NER_L_2_R_1_[O O]_[O]"",INV_W_LEMMA_L_1_R_1_[parent]_[.],""INV_W_LEMMA_L_2_R_1_[he parent]_[.]"",""INV_W_NER_L_3_R_1_[O O O]_[O]"",""INV_W_LEMMA_L_3_R_1_[by he parent]_[.]""}","{2.94252,-2.52698,2.01443,1.98219,1.98219,-1.41634,-0.949953,0.334665,0.330707,0.324957,-0.282554,-0.212128,-0.181359,-0.024521,-0.0220253,0.00138261,0}"
8afc4b5a-e433-46c9-8290-4f541a7f8f16_17_15_16,8afc4b5a-e433-46c9-8290-4f541a7f8f16_17_13_13,8afc4b5a-e433-46c9-8290-4f541a7f8f16,17,,0.997,"{Or,some,folks,prefer,Rose,Lake,"","",Mich.,"","",including,Sharon,Kellermeier,"","",Dave,and,Ellen,Nowak,"","",and,Brent,and,Pam,Cousino,.}",Ellen Nowak,15,16,Dave,13,13,"{INV_NER_SEQ_[O],INV_NGRAM_1_[and],INV_POS_SEQ_[CC],INV_WORD_SEQ_[and],INV_LEMMA_SEQ_[and],IS_INVERTED,INV_STARTS_WITH_CAPITAL_[True_True],""INV_W_LEMMA_L_1_R_1_[,]_[,]"",INV_W_NER_L_1_R_1_[O]_[O],INV_LENGTHS_[2_0],""INV_W_NER_L_1_R_3_[O]_[O O O]"",""INV_W_NER_L_2_R_1_[PERSON O]_[O]"",""INV_W_NER_L_2_R_3_[PERSON O]_[O O O]"",""INV_BETW_L_[conj_and conj_and]"",""INV_W_NER_L_3_R_1_[PERSON PERSON O]_[O]"",""INV_W_NER_L_3_R_3_[PERSON PERSON O]_[O O O]"",""INV_W_LEMMA_L_1_R_2_[,]_[, and]"",""INV_W_NER_L_2_R_2_[PERSON O]_[O O]"",""INV_W_NER_L_1_R_2_[O]_[O O]"",""INV_W_NER_L_3_R_2_[PERSON PERSON O]_[O O]"",""INV_W_LEMMA_L_3_R_1_[Sharon Kellermeier ,]_[,]"",""INV_BETW_D_[conj_and Kellermeier conj_and]"",""INV_W_LEMMA_L_2_R_2_[Kellermeier ,]_[, and]"",""INV_W_LEMMA_L_3_R_3_[Sharon Kellermeier ,]_[, and Brent]"",""INV_W_LEMMA_L_3_R_2_[Sharon Kellermeier ,]_[, and]"",""INV_W_LEMMA_L_2_R_3_[Kellermeier ,]_[, and Brent]"",""INV_BETW_[conj_and Kellermeier conj_and]"",""INV_W_LEMMA_L_2_R_1_[Kellermeier ,]_[,]"",""INV_W_LEMMA_L_1_R_3_[,]_[, and Brent]""}","{2.94252,-2.52698,2.01443,1.98219,1.98219,-1.41634,-0.949953,0.620401,-0.282554,-0.260218,0.240517,-0.20124,-0.182793,0.121314,-0.117852,-0.0994847,0.0461265,-0.044868,-0.0407692,-0.0034324,0,0,0,0,0,0,0,0,0}"
[...]
2.2. Modify template to render features
Now, we can use the following Mindtagger template to enumerate the extra feature information.
<mindtagger mode="precision">

  <template for="each-item">
    <strong title="item_id: {{item.id}}">{{item.p1_text}} -- {{item.p2_text}}</strong>
    with expectation <strong>{{item.expectation | number:3}}</strong> appeared in:
    <blockquote>
        <big mindtagger-word-array="item.tokens" array-format="postgres">
            <mindtagger-highlight-words from="item.p1_start" to="item.p1_end" with-style="background-color: yellow;"/>
            <mindtagger-highlight-words from="item.p2_start" to="item.p2_end" with-style="background-color: cyan;"/>
        </big>
    </blockquote>

    <div class="row" ng-if="item.features">
      <!-- Enumerate features with weights (leveraging AngularJS a bit more)-->
      <div class="col-sm-offset-1 col-sm-10">
        <table class="table table-striped table-condensed table-hover">
          <thead><tr>
              <th class="col-sm-1">Weight</th>
              <th>Feature</th>
          </tr></thead>
          <tbody>
            <tr ng-repeat="feature in item.features | parsedArray:'postgres' track by $index">
              <td class="text-right">{{(item.weights | parsedArray:'postgres')[$index] | number:6}}</td>
              <th>{{feature}}</th>
            </tr>
          </tbody>
        </table>
      </div>
    </div>

    <div>
      <div mindtagger-item-details></div>
    </div>
  </template>

  <template for="tags">
    <span mindtagger-adhoc-tags></span>
    <span mindtagger-note-tags></span>
  </template>

</mindtagger>
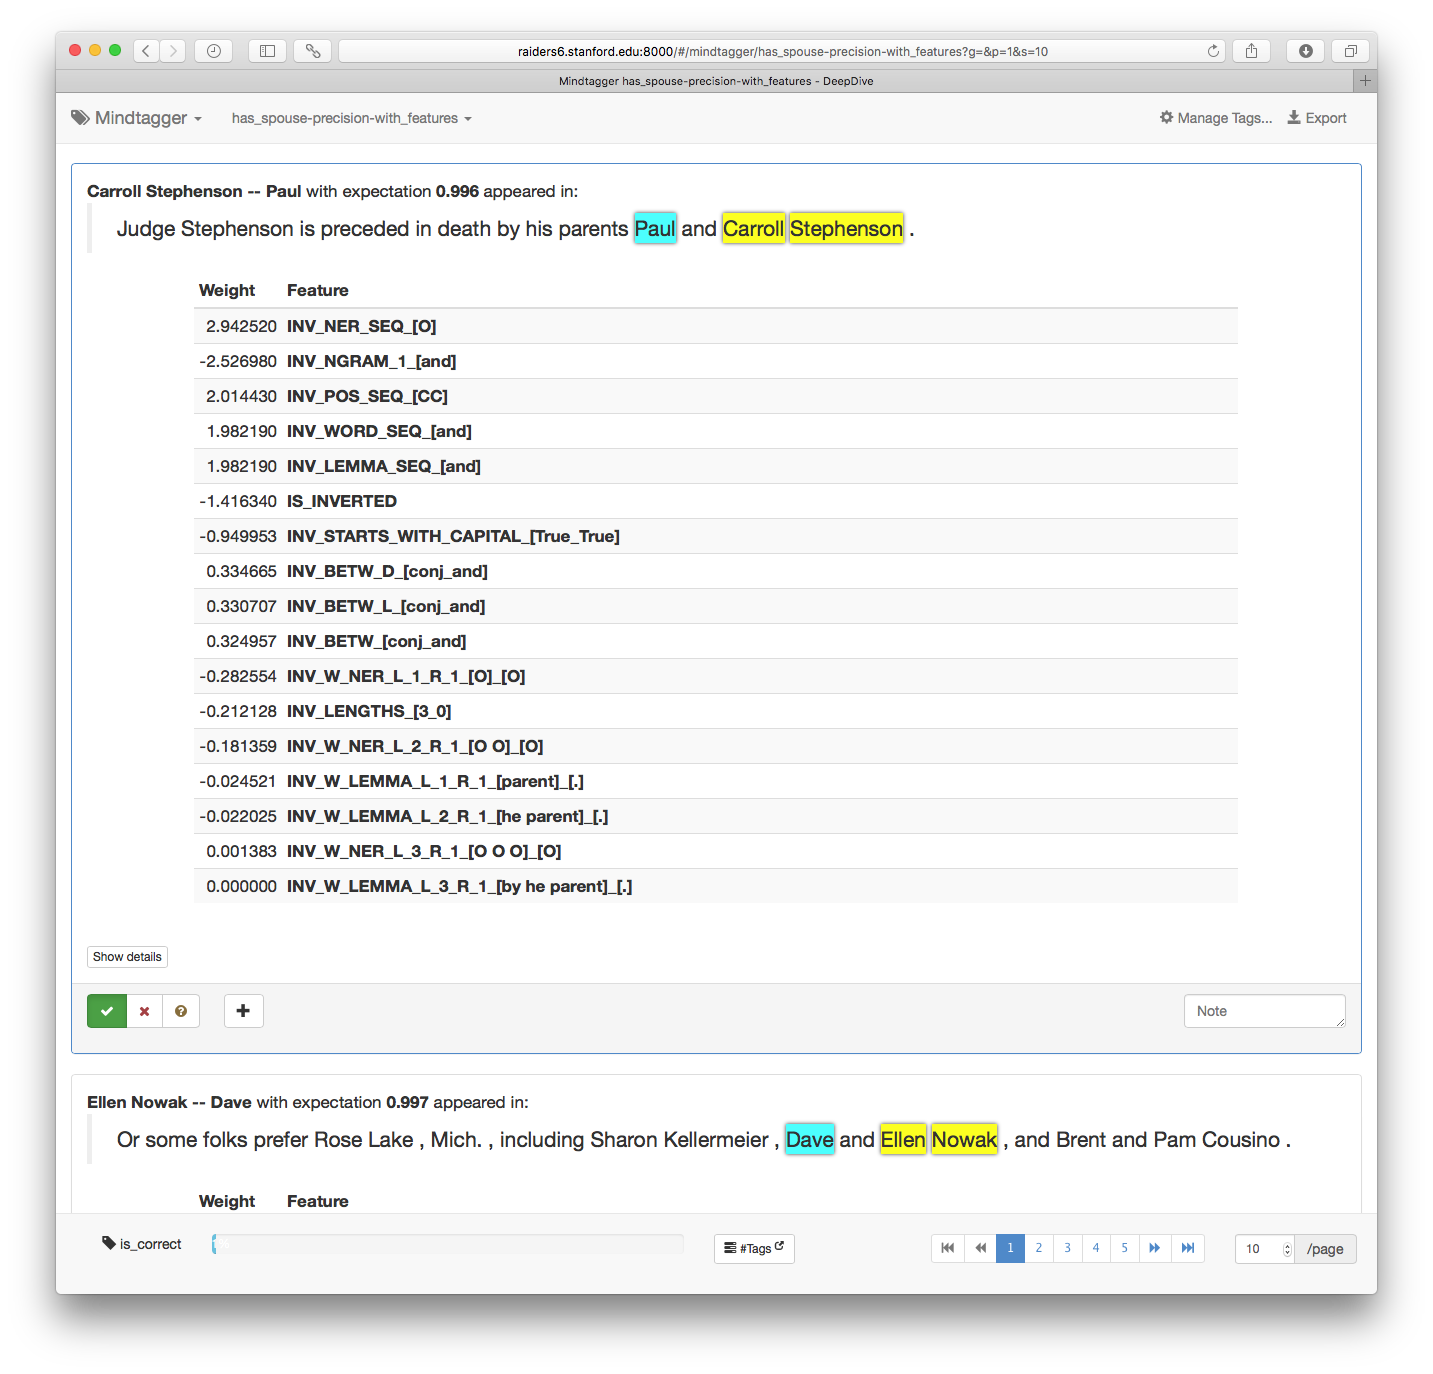
2.3. Browse the predictions with features and weights
Now, the user can see all the features next to their learned weights shown below. By looking at the features through this task, the user can discover some features that work well or not as well and can come up with a more data-driven idea for improving the application's performance for the next iteration.